About This Model
This fun but demanding origami model was created by Jeff Beynon. It is described in Japanese in Tomoko Fuse's book "Spirals", which appears to be out of print. Unfortunately, simple pictures cannot fully express the folding that is necessary to complete it. These notes are meant to compliment the pictures in Fuse's book, hopefully making it easier to fold this model. Since this web page was first published in the mid-1990s, numerous people have uploaded great instructional videos about this origami model. Be sure to check them out.
Preliminaries
The paper used for the model is very important. It should be somewhat stiff, rather than the traditional thin kami origami paper. I have found that even typing paper is too thin. I've had my best success with the colored paper you can get at copy centers (suitable for small posters that are stapled to telephone poles). Both sides of the paper will be visible in the finished model.
An 8.5 by 11 inch piece of paper should be cut so that it is 5.875 (5 + 7/8) by 11 inches. There are two parts to the folding of this model. The first is easy but tedious, and the second is difficult. In the first part, the paper is creased many times, and in the second it is contorted until it forms a spring.
The Easy/Tedious Part
The long dimension of the paper is folded into 6ths, and the short dimension is folded into 12ths. These are all "valley" folds. I find it easiest to subdivide the 12ths first, then the 6ths. In both cases, begin by dividing into 3rds, then subdividing further. The following diagram demonstrates the folds of this model.
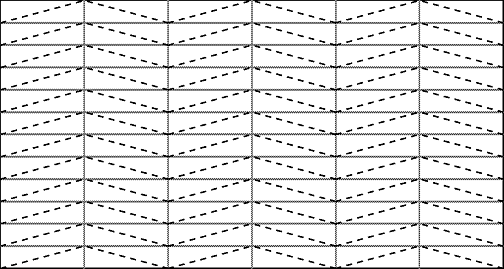
Each of the 72 little rectangles is now folded diagonally in half, with columns of 12 being folded the same way, and adjacent columns being folded perpendicular to each other. These folds should all be "mountain" folds, going the opposite way as the first set of folds. I was taught to do these folds in a methodical way that simplifies the process.
The rectangles are folded row by row in groups of 6. Holding the paper with the long dimension going left to right and the grid folds appearing as valley folds to you, fold the leftmost column over the one adjacent to it. Make the diagonal fold on the uppermost rectangle (the upper right corner moves towards you and down). The second column's top rectangle can now be folded away from you using the first column's top as a guide. Fold the 3rd through 6th columns (as a unit) behind the second column, reversing the crease between columns 2 and 3. You can now repeat the folds you performed on columns 1 and 2, and then repeat the whole process one more time for columns 5 and 6. Repeat this whole business for all 12 rows. You are now done with the easy part.
The Hard Part
The paper will now be rolled and twisted until it forms the collapsable spring. You will work down the long dimension, from one end to the other, twisting one column at a time. The first and last columns require you to form a twisted circle of paper, and then pry loose one corner of the paper so it locks the spring in place. The middle four rows are tougher to twist. This must all be done very carefully and patiently or the paper may tear, ruining a lot of work.
It is hard to describe how to perform the twisting. If you proceed slowly, it should be clear what you need to do (though maybe not how to do it). To get started, hold the paper with the short dimension running right to left, the diagonal creases appearing to you as valley folds, and the diagonal in the upper left corner running from northwest to southeast (turn the diagram 90 above degrees to the right). Working from the left to the right, collapse the diagonal folds and the vertical folds to form a fanlike circle. The rest of the paper will form a cylinder below your hands. After you have fanned the circle, pry the former upper-left-corner part out until it lies on top of the circle. You are now at the second diagram of Fuse's instructions. Collapse and twist each section of the tube until you have a flattened spring (Fuse's 5th diagram). You can work the spring as indicated in her 6th and 7th figures.
Often, the spring doesn't work smoothly at first. You must soften it up a bit while in it's "unsprung" state, and perhaps do some detail work where one part of the spring slides inside another part. The spring should always be stored in a compressed state so it will be more willing contract again each time you expand it. It wasn't until my 4th or 5th try that I was able to fold a good spring. Now it takes me about 30 minutes to make one if all goes well.